Firestopping Penetrations - Low-Voltage Compliance Guide
Compliance Guide for Security and Low Voltage Deployments: Firestopping Penetrations — Basics Every Installer Should Know
Firestopping penetrations is one of the fastest ways a clean security/low-voltage install turns into a failed inspection, a punchlist, and a costly rework cycle. Any time you drill, core, or cut through a rated wall or floor, you may be responsible for restoring the assembly’s fire- and smoke-resistance using a tested/listed firestop system matched to the exact condition—not a “close enough” field improvisation.
Disclaimer: This is general information; local codes, the AHJ, and the listed firestop system instructions govern. Always follow the adopted code edition, the project’s contract documents, and the manufacturer’s listed system details for your specific penetration condition.
TL;DR
- If you penetrate a fire-rated wall or floor, you must restore it with a listed firestop system for that exact condition (assembly + penetrant + opening size + annular space).
- Spray foam, acoustic sealant, and generic caulk are not firestop unless specifically listed and installed per a tested system for that use.
- Identify rated assemblies before drilling using drawings, labeling, door ratings, and above-ceiling clues—then select the correct through-penetration firestop or membrane penetration approach.
- Annular space, backing, depth, and surface prep are not “details”—they are what make the system pass or fail firestop inspection.
- Plan for the future: if adds/changes are likely, use re-enterable methods (pillows/blocks) or a listed solution designed for re-entry.
- Document every penetration: system ID, products used, photos, location, label—so the inspector (and future maintenance) can verify compliance.
Who this is for
- Low-voltage installers and security integrators running copper, fiber, coax, and control cabling
- Electricians installing pathways for security, access control, and surveillance
- Facilities teams maintaining penetrations over time (adds, moves, changes)
- PMs and procurement who need scopes, submittals, and closeout packages that survive inspection
Key terms
- Fire-rated assembly: A wall/floor/ceiling system built and tested to resist fire for a specified time (e.g., 1-hour, 2-hour).
- Fire-resistance rating: The time rating assigned to the assembly when constructed and protected per its tested design.
- Penetration: Any hole/opening through an assembly for cables, conduit, sleeves, pipes, cable tray, etc.
- Through-penetration: A penetrant passes completely through a rated assembly (typical for sleeves, conduit, cable bundles).
- Membrane penetration: A penetration that breaches one side of a rated wall/ceiling membrane but not all the way through (common for boxes, ring-and-stringer work, or partial-depth conditions).
- Sleeve: A pipe/tube installed in the opening to protect cables and control annular space (may be required by the listed system).
- Annular space: The gap between the penetrant (or sleeve) and the edge of the opening; critical to system compliance.
- Intumescent: Material that expands when heated, helping close openings around combustible penetrants or cable bundles (often seen in intumescent firestop products).
- AHJ: Authority Having Jurisdiction—the inspector/code authority who enforces adopted requirements.
- Listed system (UL system): A firestop design that has been tested and listed by a recognized lab; often referenced by a system number (e.g., a UL system firestop design).
What firestopping is (and what it isn’t)
Firestopping is the process of restoring a fire-resistance–rated assembly’s performance after it has been penetrated. The goal is to maintain compartmentation—limiting the spread of flame, hot gases, and smoke through fire-rated walls and floors—by sealing openings using materials and methods that have been tested as a system.
Firestopping is not:
- “Filling the hole” with whatever is on the truck
- A cosmetic patch or draft seal only
- A one-product-fits-all task (it’s a listed system problem)
- Something you can “make equivalent” by adding extra sealant, more backing, or a different product
Why penetrations matter:
- Rated walls/floors are designed to resist fire for a specified time. A single unprotected opening can become a path for smoke spread, heat transfer, and flame passage.
- Many failures are not dramatic flames—smoke migration through penetrations can compromise egress routes and adjacent compartments long before structural failure.
Common myths (callout)
- “Acoustic sealant equals firestop.” It doesn’t. Acoustic and smoke seal products may reduce air leakage but are not automatically firestop.
- “Any expanding foam works.” Generic spray foam is not a firestop unless it is specifically listed for that application and installed exactly per the listed system.
- “More is better.” Extra depth, extra layers, or mixing products can void the system. Listed designs have controlled dimensions and materials.
- “Low voltage doesn’t count.” Low voltage firestopping still matters—fire doesn’t care about signal level.
How to know when firestopping is required
In U.S. practice, firestopping is required when you penetrate assemblies that are required to be fire-resistance rated and/or when penetrations occur in assemblies designated to limit fire and smoke migration. The exact triggers depend on the adopted code edition and project documents, so your job is to verify the assembly and then match a listed system.
Practical ways to identify fire-rated walls and floors:
- Drawings/specs: Look for life safety plans, wall type schedules, rated shaft details, smoke barrier notes, and penetrations requirements.
- Labels/stamps: Some rated walls, shafts, and above-ceiling barriers have labeling; firestop field labels may already exist near penetrations.
- Door ratings: Fire doors (with labeled ratings) often appear in rated corridors, stairwells, electrical rooms, and shaft entrances—clues that adjacent walls may be rated.
- Above-ceiling clues: Fire/smoke barriers may extend to deck; look for top-of-wall fire/smoke sealing details, continuous barriers, and rated head-of-wall joints.
- Building areas commonly rated: Exit stairwells, elevator shafts, riser closets, electrical rooms, fire pump rooms, corridors in some occupancies, and tenant separations (varies by design).
- Ask the GC/facilities/AHJ early: “Is this assembly rated? What’s the rating? Any specific firestop standard or approved products?”
Ask before you drill (mini-checklist)
- Is this wall/floor shown as rated on drawings (life safety / architectural)?
- What is the rating (e.g., 1-hr, 2-hr) and assembly type (gypsum, CMU, concrete slab)?
- Is it a smoke barrier or fire barrier area requiring special sealing?
- What penetrant am I installing (cable-only, sleeve, EMT, PVC, tray)?
- Will this opening be re-entered later (adds/changes)?
- Who owns firestopping in scope—LV, electrical, GC, or a dedicated firestop sub?
- Do I have an identified listed system (system ID + installation details) before making the hole?
Verification: confirm the assembly and confirm the listed system (must-do)
Verify the assembly
- Confirm the rated assembly type and rating from architectural drawings and the wall schedule.
- Confirm whether you’re dealing with gypsum studs, masonry, or concrete (the listed system depends on it).
- If the field condition differs from drawings (unexpected layers, different thickness, shaftliner, etc.), treat it as a stop-work trigger.
Verify the listed system
- Use your organization’s approved firestop submittals (or the project’s required listing source) to locate a listed system that matches:
- Wall vs floor
- Assembly construction (e.g., gypsum vs concrete)
- Penetrant type (cable-only, conduit, sleeve, tray)
- Opening size and annular space range
- Required backing/packing and sealant depth
- Any restrictions (max cable fill, min separation, required supports)
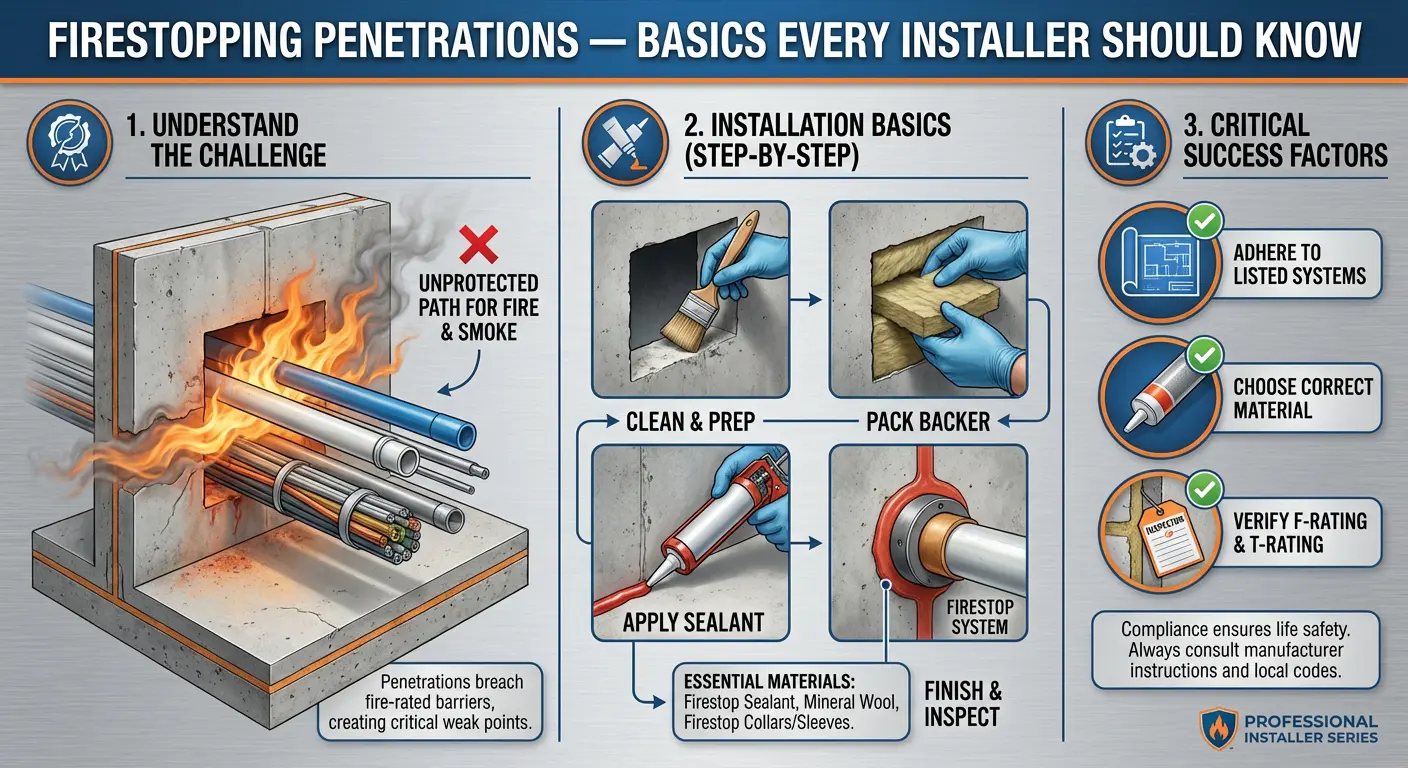
The right way to firestop: the jobsite workflow
Treat firestopping like termination work: planned, repeatable, and documented. Here’s a field-first workflow that prevents “hole first, homework later.”
- Plan
- Identify rated assemblies on drawings and in the field.
- Select the correct listed system(s) for the likely penetration types.
- Stage materials: firestop sealant, backing, sleeves, collars/wraps, putty, labels, and documentation forms.
- Drill/cut
- Drill clean, round openings sized to the listed system requirements.
- Avoid oversized holes “for convenience.” Oversize is a common inspection fail.
- Prep the opening
- Remove dust and debris; clean surfaces per the product/system requirements.
- Ensure the substrate is sound (no crumbling gypsum edges or spalled concrete).
- Install sleeve (if used/required)
- Install sleeves exactly as the system specifies (material, diameter, projection, fastening).
- Confirm annular space around sleeve and penetrants meets the system range.
- Pack/backing
- Install backing material (e.g., mineral wool) to the required depth and compression.
- Use depth gauges/marks—backing depth is measurable and inspectable.
- Apply firestop
- Apply the specified firestop sealant or intumescent material to the required thickness and configuration.
- Tool and finish as required. Do not substitute products or change layering.
- Finish/label
- Label each penetration (or group) with system ID and installer/company/date if required by the project.
- Ensure labels remain visible and durable for maintenance.
- Document
- Capture photos and record system IDs, products, and locations.
- Submit closeout documentation in the format expected by the GC/facilities.
Stop-work triggers (escalate instead of guessing)
- You cannot confirm the assembly is rated or non-rated.
- The field assembly doesn’t match drawings (thickness, layers, shaftliner, unusual construction).
- The opening is oversized outside the listed system range.
- The penetrant type changed (e.g., PVC instead of EMT; tray instead of cable-only).
- You don’t have a listed system that matches the condition.
- The design requires separation rules (e.g., power-limited vs non–power-limited) and the pathway plan conflicts.
Choosing the correct firestop method (decision guide)
Firestop selection is not “pick a tube.” It’s “pick a listed system.” This guide helps you narrow the method category so you can locate a compatible system.
Decision flow (field logic)
- Wall or floor?
- Floor penetrations often demand stricter support, gravity considerations, and sleeve details.
- Wall penetrations often require membrane-vs-through determination.
- Cable-only, conduit/sleeve, or tray?
- Cable-only: single cables or bundles through an opening (common in security).
- Conduit/sleeve: EMT/PVC sleeves, rigid conduit, or core sleeves.
- Cable tray: larger openings; often needs a dedicated cable tray firestop approach.
- Opening size + annular space
- Measure actual hole diameter and penetrant OD(s).
- Compare to the listed system’s allowed annular space range.
- Combustible or noncombustible penetrants
- Noncombustible: steel conduit, EMT, copper (often treated differently).
- Combustible: PVC conduit/pipe often requires firestop collars or intumescent wraps.
- Future adds?
- If frequent changes are expected, prioritize re-enterable designs (pillows/blocks) or systems designed for re-entry.
When to use what (practical guidance)
- Firestop sealant/caulk: Good for many cable-only and sleeve conditions when paired with correct backing and depth control.
- Intumescent putty (putty sticks/pads): Useful for small openings, membrane penetrations, and box protection; can be cleaner for finish spaces.
- Pillows/blocks (re-enterable): Useful where cables will be added/removed (IDF/MDF walls, riser rooms). Must still be listed for the opening and assembly.
- Collars/wrap strips: Typical for combustible penetrants like PVC where expansion/closure under heat is required.
- Sleeves + sealant: Helps control annular space, protects cables, and can simplify compliance—if the system is listed that way.
Comparison table: common firestop method categories
| Method category | Best for | Limitations | Re-enterable? | Typical mistakes that fail inspection |
|---|---|---|---|---|
| Sealant/caulk (firestop sealant) | Cable-only penetrations, sleeves, small-to-medium annular spaces, many gypsum/concrete conditions | Requires correct backing, depth, and surface prep; curing time matters | Usually no (can be reworked, but not designed for routine changes) | No backing; wrong depth; dirty surfaces; oversized hole; mixing products |
| Putty (intumescent putty, putty pads) | Small penetrations, membrane penetrations, box protection, neat finishes | Not for every through-penetration condition; may have size/fill limits | Sometimes limited | Using as “gap filler” without a listed system; insufficient thickness; missing box listing requirements |
| Pillows/blocks (re-enterable) | Frequent adds/changes, larger openings, cable bundle management | Must be installed to listing density/config; can be displaced if not retained properly | Yes | Loose install; missing retention/frames; wrong opening size; unsealed edge conditions |
| Collars/wraps (intumescent firestop collars/wrap strips) | Combustible penetrants (PVC), mixed penetrations where closure is needed | Must match pipe size/material and assembly; fastening method is critical | No | Wrong collar size; incorrect anchor/fasteners; missing required wrap length; wrong location relative to wall/floor |
| Sleeves + packing/backing | Pathway control, annular space management, multi-cable routes | Sleeve material/projection must match listing; can complicate if improvised | Depends on system | Using unlisted sleeve; wrong projection; annular space out of range; no packing compression |
Listed systems and compliance for firestopping penetrations (practical, not legal)
Firestopping succeeds when you treat it like a tested assembly, not a product. A listed system (often referenced as a UL system) defines the exact combination of:
- Assembly type and rating
- Penetrant type(s) and sizes
- Opening size and annular space
- Backing/packing materials and compression
- Sealant type, thickness, and configuration
- Any collars/wraps, sleeves, frames, or retention devices
- Cable fill limitations and support requirements
Why “mix-and-match” fails
Even if each component is “fire-rated,” the system can fail inspection if:
- The sealant is listed, but not for your assembly/penetrant combination
- The backing material type/density differs from the tested design
- The annular space is outside the listed range
- A collar/wrap is substituted or installed on the wrong side
- The configuration changes (depth, layering order, number of wraps)
Standards you will hear on projects
For through-penetration firestop, you may see references to ASTM E814 (and equivalent test methods used in common listings). Treat these references as indicators that the project expects tested through-penetration firestop systems, not field inventions. The exact accepted listings and documentation requirements come from the project specifications and AHJ.
Documentation section: what to keep for inspection and maintenance
Capture enough information so someone else can verify the penetration later without guessing:
- System ID (e.g., UL system number or project-approved system reference)
- Product data (submittals / technical data sheets / SDS if required)
- Batch/lot numbers if your QA process or spec requires it
- Location: floor, room, gridline, wall ID, and side of wall if relevant
- Penetration details: opening size, penetrant type (cables, sleeve, conduit), annular space notes
- Photos: before, during (backing installed), and after (finished + label visible)
- Installer info/date (often needed for signoff)
- Re-entry notes if the method is intended to be reopened (pillows/blocks)
Procurement/spec notes: how to avoid scope gaps (low-voltage edition)
In low-voltage scopes, firestopping fails when it’s “someone else’s problem.” To prevent finger-pointing, include explicit scope language:
- Define ownership: “LV contractor shall firestop all penetrations created by LV scope in rated assemblies per listed systems and project firestop submittals.”
- Require preselection: “Contractor shall identify listed system(s) prior to coring/drilling in rated assemblies.”
- Include closeout deliverables: system IDs, photos, labels, penetration log.
- Address re-entry: require re-enterable solutions in telecom rooms/riser pathways if frequent changes are expected.
- Coordinate pathway rules: if mixed systems (e.g., coax + power-limited + non–power-limited) will share sleeves/trays, require coordination with NEC separation and pathway plans as applicable to the project.
Installation details that make or break compliance
These are the field details inspectors look for because they correlate with tested performance.
- Surface prep: Dusty gypsum and dirty concrete reduce adhesion. Clean and dry as required by the system/product.
- Depth control: Firestop sealant thickness is not “until it looks full.” Use depth marks, backing placement, and tooling to hit the listed dimension.
- Backing material: Mineral wool (common) must match density and compression requirements in the system. Under-packed backing can fail; over-packed bundles can also violate system limits.
- Annular space control: Measure it. Too tight and you can’t install backing/sealant correctly; too large and you’re outside the system.
- Curing times: Some firestop sealants require cure time before disturbance or painting; schedule accordingly to avoid damage before inspection.
- Cable movement/support: Provide proper cable support so movement doesn’t crack sealant or dislodge backing. Avoid tension pulling through fresh sealant.
- Bundling: Large, tight bundles can create voids and prevent sealant from wetting surfaces. Route and dress bundles to allow proper packing and sealant contact.
- New vs retrofit: Retrofit work often reveals oversized, irregular holes. If the opening cannot meet a listed design, use an approved remediation plan (resize with a sleeve/frame solution or patch-and-recore per project direction).
- Re-entry considerations: If the penetration will be re-opened, choose a system designed for it and implement labeling/retention so future techs don’t “dig it out and forget.”
Common mistakes (8–12) that fail inspections
- Using non-listed materials (generic foam, acoustic caulk, random putty) as “firestop.”
- Not verifying the wall/floor is rated until after the hole is drilled.
- Oversized or irregular openings that exceed the listed system range.
- Missing or incorrect backing/packing material (wrong type, depth, compression).
- Wrong sealant depth or incomplete seal around the annular space.
- Mixing products from different systems (“this caulk + that backing + a different collar”).
- Treating a cable tray penetration like a simple cable hole (no tray-rated system/retention).
- Installing collars/wrap strips incorrectly (wrong side, wrong fasteners, wrong wrap length).
- Failing to label penetrations or provide system documentation for the inspector.
- Overstuffing cable bundles (voids, poor sealant contact, future adds become impossible).
- No coordination on mixed services (power-limited vs other wiring rules; pathway conflicts).
- Damaging the firestop after installation (pulling cables, flexing conduit) before inspection.
Troubleshooting and inspection failures
Use this “symptom → likely cause → fix” approach to close issues fast and prevent repeat failures.
| Symptom (what you hear/see) | Likely cause | Fix (field action) |
|---|---|---|
| Inspector rejects the material (“not approved”) | Product not listed for the condition, or not in approved submittals | Stop using it; select a listed system from approved sources; reinstall per system |
| “Where’s the system documentation?” | No system ID, no cut sheets, no penetration log | Provide system ID, submittal pages, photos, and a penetration schedule tied to locations |
| Oversized hole flagged | Opening/annular space outside listed range | Implement a listed remediation approach (sleeve/frame, patch/recore) and re-firestop |
| “Wrong product for this penetrant” | Combustible penetrant (PVC) treated like noncombustible | Use a listed system with collars/wraps or correct intumescent solution |
| Sealant cracks or separates | Poor surface prep, movement, insufficient backing | Remove and reinstall per system: clean surfaces, correct backing compression, proper support |
| No backing present | Installer skipped packing/backing step | Remove partial firestop, install correct backing depth/compression, then sealant |
| Cable tray not addressed | Tray opening treated as cable bundle | Use a listed cable tray firestop system with retention/frames and correct fill method |
| Annular space unsealed in spots | Incomplete application, voids behind cables | Rework: ensure continuous seal, correct tooling, confirm depth, re-dress cables |
| Penetration can’t be re-entered | Solid sealant used where adds are required | Convert to a listed re-enterable solution (pillows/blocks) if allowed by spec/AHJ |
Example scenarios
These are illustrative field scenarios. Always confirm the exact listed system for your assembly and penetrant condition.
1) Bundle of Cat6 through a rated wall
- Assembly type: 1-hr rated gypsum stud wall (two layers each side, typical corridor condition)
- Penetration type: Cable-only (Cat6 bundle)
- Opening size / annular space: ~2" round hole; cable bundle OD ~1" (annular space varies)
- Chosen method category: Backing (mineral wool) + firestop sealant/caulk
- Reasoning: Cable-only penetrations in gypsum walls commonly use packing and sealant to achieve the listed depth and annular space requirements. Key is controlling annular space and avoiding overstuffing.
2) Conduit sleeve through a rated floor
- Assembly type: 2-hr concrete floor slab
- Penetration type: Steel sleeve through floor with cable pull
- Opening size / annular space: Core ~4"; sleeve OD ~3.5" (annular space ~1/4" total)
- Chosen method category: Sleeve + packing/backing + firestop sealant
- Reasoning: Floors often benefit from sleeves to protect cables and standardize annular space. A listed through-penetration system will specify sleeve projection, packing depth, and sealant thickness.
3) Mixed cable bundle (power-limited + coax) where separation rules may apply
- Assembly type: 1-hr rated wall between telecom and corridor
- Penetration type: Cable-only mixed bundle (Cat6 + coax + control cables)
- Opening size / annular space: ~3" opening; variable annular space around bundle
- Chosen method category: Re-enterable pillows/blocks or a listed cable bundle system designed for re-entry
- Reasoning: Mixed systems often see future adds/changes. Re-enterable solutions can reduce demolition risk. Coordinate pathway/separation requirements per project/NEC constraints before combining services.
4) Cable tray penetration (required)
- Assembly type: 2-hr rated wall (shaft or barrier wall condition)
- Penetration type: Cable tray passing through wall
- Opening size / annular space: Rectangular opening sized to tray + clearance (varies)
- Chosen method category: Listed cable tray firestop system (often includes retention/frames + fill method)
- Reasoning: Tray penetrations are not “just a big cable hole.” Inspectors expect a tray-specific listed system with retention and defined fill/closure behavior.
5) Outlet/box in a rated wall near security devices
- Assembly type: Rated gypsum wall
- Penetration type: Membrane penetration (device box for power or interface)
- Opening size / annular space: Box cutout per device
- Chosen method category: Putty pads (box protection) + correct box/listing practices
- Reasoning: Boxes in rated walls are commonly handled as membrane penetrations with protective putty systems where permitted by design/specs. This prevents the box opening from reducing the wall’s performance.
Jobsite checklist
Pre-work: verify rated assemblies + approvals
- Confirm rated walls/floors on drawings (life safety + wall schedules)
- Confirm required rating and assembly type in the field
- Identify responsible party for firestopping in the project scope
- Select listed systems for the expected penetration conditions before drilling
- Coordinate any pathway/separation rules for mixed services
Materials verification: listed products + accessories
- Firestop sealants/caulks listed for the selected system(s)
- Backing/packing materials (e.g., mineral wool) per system density/compression
- Sleeves, collars/wrap strips, or retention frames as required
- Re-enterable pillows/blocks if future changes are expected
- Labels + documentation supplies (penetration log forms, markers, photo workflow)
During work: installation steps + labeling
- Drill/cut clean openings to the listed size range
- Clean/prep surfaces
- Install sleeves (if required) with correct projection/fastening
- Install backing to required depth/compression
- Apply firestop to required thickness and continuity (no voids)
- Dress/support cables to prevent movement damage
- Label penetration with system ID and required info
Closeout: documentation package + self-check
- Photos: before/during/after (label visible)
- Penetration log: location + system ID + products used
- Product data sheets/submittal references included
- Punchlist self-check: annular space sealed, backing present, correct method for tray/PVC, no damage prior to inspection
FAQs (8–10)
- Do I need to firestop every cable hole?
If the hole is in a rated assembly (fire-rated wall/floor) or a barrier requiring protection, yes—penetrations generally must be protected using a listed system matched to the condition. If it’s not a rated assembly, firestopping may not be required, but confirm on drawings/specs and with the AHJ/project team. - What’s the difference between fire caulk and regular caulk?
Firestop sealant is formulated and listed as part of a tested system to resist fire/smoke spread under specific conditions (assembly, penetrant, dimensions). Regular caulk is not evaluated that way. - Can I use expanding foam for firestopping penetrations?
Only if the foam is specifically listed for your exact penetration condition and installed exactly per the listed system. Generic spray foam is not an acceptable substitute. - Can I add cables later through a firestopped hole?
Sometimes. Re-entry depends on the listed system and method used. Pillows/blocks and some listed re-enterable designs support adds/changes better than solid sealant-only approaches. - What should I show the inspector?
Be ready with the system ID, product documentation/submittal reference, photos (including backing and finished condition), labels in place, and a penetration log that maps locations to systems. - How do I know if a wall is fire-rated?
Start with drawings and wall schedules, then confirm in the field (door ratings, barrier continuity to deck, rated area clues). When uncertain, treat it as rated until verified and escalate. - Is a sleeve always required?
No. Some listed systems are cable-only. Others require sleeves to control annular space or address floor penetrations. Follow the selected listed system. - What’s the difference between through-penetration and membrane penetration firestop?
Through-penetration is a complete pass-through (common for sleeves/conduit/cables through the full wall/floor). Membrane penetrations breach only one side of the assembly (common for boxes). They use different listed systems and methods. - Why did my firestop fail even though I used a “fire-rated” product?
Because firestopping is a system, not a product. Wrong annular space, missing backing, incorrect depth, wrong penetrant, or mixing components can all fail inspection even if the tube says “firestop.”
Suggested products to consider (categories + selection notes, not brands)
- Firestop sealant (rated)
- Fits: many cable-only and sleeve conditions when paired with correct backing and depth.
- Selection notes: confirm listing for your assembly and penetrant; check required thickness, tooling, and cure constraints.
- Putty pads / putty sticks
- Fits: membrane penetrations, box protection, small/clean penetrations.
- Selection notes: verify allowed box types and wall ratings; confirm thickness and coverage requirements.
- Re-enterable pillows/blocks
- Fits: frequent adds/changes (telecom rooms, risers), larger openings, cable bundle management.
- Selection notes: confirm required retention/frames and installation density; plan labeling so future techs reinstall correctly.
- Collars / wrap strips (intumescent)
- Fits: combustible penetrants (PVC) and conditions requiring closure under heat.
- Selection notes: match pipe size/material; verify fastening method and side-of-wall/floor requirements.
- Sleeves / backing materials
- Fits: annular space control, pathway protection, standardized penetrations.
- Selection notes: ensure sleeve material/projection matches the listed system; choose backing that meets required density/compression.
- Labels + documentation supplies
- Fits: inspection readiness and long-term maintenance.
- Selection notes: use durable labels; standardize penetration logs and photo naming so locations map cleanly to system IDs.
Assumptions made
- The project is a typical U.S. commercial environment where rated corridor/shaft/room assemblies and firestop inspections are part of closeout.
- The site audience performs or manages low-voltage cabling work (security/access/CCTV/telecom) that commonly penetrates rated assemblies.
Sources to verify internally
- Adopted code edition and local amendments (AHJ requirements)
- Architectural/life-safety drawings, wall schedules, and project specifications
- Approved firestop submittals and the selected listed system details for each condition
- Manufacturer listed system installation instructions (including backing, depth, and curing constraints)
- AHJ/inspector guidance on labeling, documentation, and inspection readiness
Frequently Asked Questions
In most jurisdictions, yes. The NEC and IBC assign firestopping responsibility to the contractor who creates or uses the penetration. If you core a hole through a fire-rated wall or floor assembly for cable routing, you are responsible for restoring that assembly's fire rating using a tested and listed firestop system. Even if you use an existing penetration, if it is not already properly firestopped, the AHJ may cite you during inspection. Always document your firestop installations with photos and system identification for closeout packages.
No. Fire caulk (like 3M CP 25WB+ or Hilti CFS-S SIL) is only one component of a listed firestop system. A firestop system is defined by the UL or Intertek tested assembly number (e.g., UL System W-L-8065) which specifies the exact wall type, opening size, cable type and fill ratio, sealant depth, and backing material. Using fire caulk alone without matching a listed system is a code violation—even if the caulk itself is rated. Always look up the system number that matches your specific penetration condition.
The F-rating measures how long the firestop system prevents flame passage through the penetration (e.g., F-2 = 2 hours). The T-rating measures how long the unexposed side stays below 325 degrees F above ambient temperature. A system can have an F-2 rating but no T-rating, meaning fire will not pass through, but heat will still conduct. T-ratings matter most for floor penetrations and walls where combustible materials may be stored on the unexposed side. Most AHJs require both F and T ratings matching the assembly's listed fire resistance.
Generally, no. Firestopping is required only for penetrations through fire-resistance-rated assemblies—walls, floors, and ceiling/floor assemblies that have a specific hourly fire rating (1-hour, 2-hour, etc.) per the building's construction documents. However, smoke barriers and smoke partitions may also require firestopping even without a fire rating. Always check the architectural drawings for assembly ratings and consult the AHJ if the rating is unclear. When in doubt, firestop it—the material cost is minimal compared to a failed inspection.
Start with three pieces of information: (1) the wall or floor assembly type and fire rating from the architectural drawings, (2) the penetration size (diameter or opening dimensions), and (3) the cable types and fill ratio going through the opening. Then use the firestop manufacturer's online selector tool (STI, Hilti, 3M, and Specified Technologies all offer free tools) to find the matching tested system. The tool will output the exact UL or Intertek system number, required materials, installation depth, and any special conditions. Print the system detail sheet and keep it on-site for the inspector.
Related Products